THE 475/605 "25 to 33 and back" SWITCH
Version: 1.1; August 24, 1995.
What is it?
This paper contains complete instructions on how to build a switch for your Quadra 605, Performa 475 or LC 475, which will allow you to change the working speed from 25MHz to 33MHz (and maybe back to 25MHz). It is based on the permanent modification by Alexander W. Chin (alex@gerulf.acsu.unsw.edu.au). With less than 10 USD of parts, you'll get 33% more power and maintain a 100% compatible computer.
Why switch? All I want is speed!
You'll get the speed. One of the main drawbacks of the modification by Alexander W. Chin is that the System 7.5 installer doesn't recognize an accelerated 475/605 as a known Mac, thus preventing you from making a fresh install of System 7.5 on that machine. While there might be software solutions to that problem, I preferred looking for a hardware fix, which should guarantee 100% compatibility for future OS releases. (If you hold down the option key on installer launch, you can do a custom install that gets around this problem with Apple's System 7.5.)
How does it work?
I didn't invent something new. All I did was analyze the instructions available on the Clock Chipping Home Page, and measured some resistors on the board. There might be an even easier way to do the switch, but for now I'll concentrate on this one. I am not a hardware guy, so there won't be a great technical explanation. A thorough explanation on how clock chipping works can be found on the Clock Chipping Home Page.
Well, let's do it!
Hold on. I have a small disclaimer to insert before we start with the job. Doing this modification might ruin your motherboard. It involves soldering on traces smaller than 4 square millimeters, desoldering of two surface mount resistors (about twice the size of the . on your keyboard). It has been tested and seems to work great, but I make no implied or expressed guarantee that it will work on your machine. Proceed at your own risk. Read Alexander W. Chin's Q605 (LC475, P475, P476) Speedup, then read my instructions, and understand them.
Make sure your hands are steady, go for it!
Check that you have the following parts handy:
- one DPDT ON/ON switch (it has two rows of three contacts)
- about four feet of small electric wire
- one 300 Ohm (a 330 Ohm resistor is fine if that is all you can find) and one 4.7k Ohm resistor, 1/4 watt
- a heat sink for the 68040
- a small box or some non conductive tape to protect the switch from being shorted
- a soldering iron (even better two) and solder
The modification
OK, here we go:
- take antistatic precautions! Static discharges have destroyed many electronic devices like motherboards!
- open your Quadra 605 / Performa 475 / LC 475. Unplug all internal and external connections (internal: floppy disk drive cable, hard disk power and SCSI cable, fan and speaker, power cable; if installed: any PDS card). Remove the fan
- push the two latches on both sides of the motherboard and slide the board towards the hard disk, until you can remove it. Be gentle, do not stress the board!
- remove the SIMMs and the VRAMs
- flip your motherboard so that the bottom faces you
- remove the two surface mount resistors at locations R21 and R25 on the bottom of your motherboard. This is an easy job if you use two soldering irons to heat both sides of the resistor. Keep the resistors in a safe place. NOTE: be careful not to tear of one of the motherboard contacts. Doing this might prevent your computer from functioning correctly again!
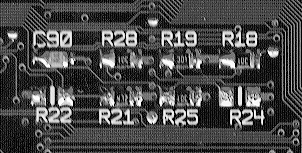
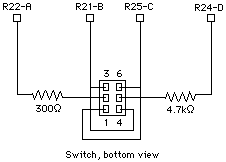
- cut four wires approximately one foot long, and solder them on the following points: wire A on left pad of location R22, wire B on left pad of location R21, wire C on left pad of location R25, wire D on right pad of location R24

- on the other end of cable A solder a 300 Ohm resistor (or the 330 Ohm one), on the other end of cable D a 4.7k Ohm resistor
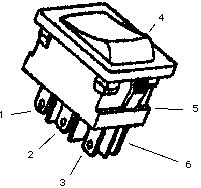
- the two resistors have to be soldered each on one side of the middle pin of the switch (numbered 2 and 5). Wire B has to be soldered onto the upper right (4) and the lower left (3) contact of the switch; wire C on the lower right (6) and upper left (1) contact
a schematic of the switch, the resistors, and their associated connections is shown below
- if you choose to mount a heat sink, do it now. The DigiKey heat sink can be mounted quite easily if you pull out the 68040 a few millimeters. I measured that with a heat sink, the CPU@33MHz stays about 15°F (8°C) below the temperature of a CPU@25MHz without a heat sink
- carefully put the motherboard back in place, and plug all the cables back in where they belong
- that's it. Protect the switch against shortages with some tape or a box, and place it somewhere safe. Figure out which position is 25MHz, and which is 33MHz, and have fun!
Remember: you have to install the new System Enabler provided with System Update 3.0 for your computer to work at 33MHz (only with System prior to 7.5).
Credits:
Credits go to the two clock chipping gurus on the net, Guy Kuo (guykuo@u.washington.edu) and Marc Schrier (schrier@mac.com), and to Alexander W. Chin (alex@gerulf.acsu.unsw.edu.au), who brought us the original Q605 (LC475, P475, P476) Speedup. Thanx to Michael Kaiser, Sterling Babcock, Peter.
Version and comments:
I'm looking forward receiving some feedback on this work. You can reach me at rschwegler@sgcl1.unisg.ch
If you wanna send me a postcard, please do so:
Ralph Schwegler
Ruhbergstrasse 63
9000 St. Gallen
Switzerland
My phone number is: +41 71 276469
My fax number is: +41 71 288023